

Post Recenti
- Certificati SSL gratuiti per passare a https: SSL For Free
- Freenas
- File system
- Godmode
- chrome desktop
- GUIDA PRATICA PER LA SOSTITUZIONE DELLA PCB DEL PROPRIO HARD DISK
- Tenere al sicuro i dati della chiavetta USB con VeraCrypt
- Comando Google home
- Riparare TVBox
- Autorizzazioni cartelle condivise in Windows: come gestirle
- Bottoni share per social
- Come creare un pacchetto quickstart per Joomla 3.x
- Errore windows update 0x80070002
- Esportare database sql in excel
- Come esportare articoli joomla
Menu Principale
Login
Contavisite
Realizzazione della rete Hotspot Wi-Fi
- Dettagli
- Categoria: Assistenza Software
- Pubblicato Sabato, 22 Aprile 2017 07:45
- Scritto da Super User
- Visite: 2423
Realizzazione della rete Hotspot Wi-Fi
La realizzazione di una rete Wi-Fi per gestire un Hotspot è una fase molto delicata. I fattori che influenzano la progettazione sono molteplici: dimensioni dell'area da coprire, presenza di ostacoli (muri, vegetazione etc.), disponibilità di una rete ethernet cablata, numero di utenti stimati etc.
Lo scopo di questa guida è quello di mostrare alcune soluzioni per risolvere le problematiche più comuni a cui si può andare incontro nella realizzazione di una rete Hotspot Wi-Fi.
La scelta dell'hardware
Una rete Hotspot Wi-Fi è fondamentalmente composta da due tipi di elementi:
- Hotspot Router: ha il compito di gestire le connessioni all'Hotspot ovvero di abilitare o meno gli utenti ad accedere ad internet. Questo router viene sempre collegato ad un qualsiasi dispositivo in grado di fornire connettività internet come ad esempio modem ADSL/DSL, modem satellitari e dispositivi 3G/4G.
La scelta del tipo di router da utilizzare dipende sostanzialmente dal numero di connessioni simultanee che il nostro Hotspot deve essere in grado di gestire. Generalmente fino a circa 50 connessioni simultanee è sufficiente utilizzare il router fornito con il pacchetto base di My Wi-Fi Service (Tp-Link 841). Superato questo valore è opportuno orientarsi sui router Mikrotik come ad esempio l'RB2011 (circa 100 connessioni), l'RB1100AHx2 (500 connessioni) fino ad arrivare ai router della serie CCR1036 (oltre 10000 connessioni). - Dispositivi utilizzati per estendere il segnale Wi-Fi: si tratta di Access Point, Switch e Router Wireless.
In generale è possibile collegare all'Hotspot Router qualsiasi dispositivo che non operi un mascheramento del Mac Address (MAT o Mac Address Translation). Questi tipi di dispositivi infatti, sostituiscono il Mac Address dei client a loro connessi con uno stesso Mac Address (quello del router wireless) impedendo all'Hotspot Router di distinguere i vari client che si connettono all'hotspot.
Il MAT è spesso utilizzato da Router Wireless, Repeater e Range Extender mentre Switch ed Access Point non utilizzando il mascheramento e possono quindi essere utilizzati senza problemi all'interno della rete Hotspot.
I router wireless possono essere utilizzati per ripetere il segnale Wi-Fi esclusivamente in modalità WDS mentre è fortemente sconsigliato l'utilizzo di Repeater e Range Extender.
Configurazione di base
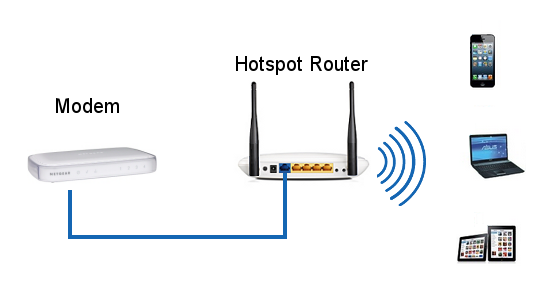
La configurazione minima necessaria a gestire un Hotspot Wi-Fi è costituita da un Hotspot Router (wireless) collegato ad un modem (ADSL, DSL, satellite etc.).
Come si vede dal precedente schema, l'installazione di un Hotspot di questo tipo è banale. Si tratta però di un piccolo Hotspot che coprirà un'area piuttosto limitata in quanto il segnale Wi-Fi viene emesso esclusivamente dall'Hotspot Router.
Le dimensioni dell'area coperta sono difficilmente prevedibili. In spazio aperto l'area coperta può arrivare ad avere un raggio di 20-30 metri mentre all'interno di un edificio la copertura diminuisce drasticamente fino ad arrivare ad un raggio interno ai 10-15 metri. In quest'ultimo caso l'area coperta è fortemente influenzata dal numero e dalle dimensioni dei muri presenti nel locale.
Generalmente una rete di questo tipo è sufficiente per creare Hotspot Wi-Fi in Bar, Pub, Ristoranti e Biblioteche.
Utilizzo di Access Point
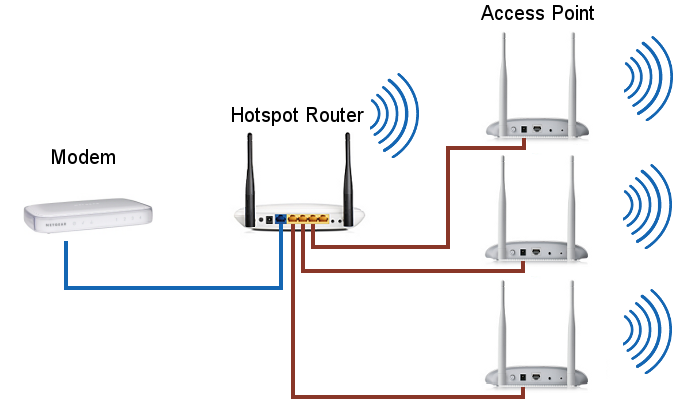
Il modo più efficiente per estendere la copertura del segnale Wi-Fi è quello di collegare degli Access Point all'Hotspot Router tramite cavi ethernet.
Per poter sfruttare questa configurazione è indispensabile che nella location di My Wi-Fi Service non sia abilitato il flag "Separa il WiFi dalla Lan".
Gli Access Point potranno anche essere connessi a degli switch a loro volta connessi all'Hotspot Router.
In questo modo è possibile coprire un'area di dimensioni arbitrarie utilizzando tutti gli Access Point necessari.
Questa configurazione si presta molto bene a coprire grandi ambienti al chiuso, come ad esempio alberghi, oppure delle aree all'aperto come campeggi e villaggi turistici.
In quest'ultimo caso sarà necessario utilizzare degli Access Point da esterno (comunemente detti Antenne) come ad esempio i dispositivi Ubiquiti Picostation M2 che presentano il grande vantaggio di supportare l'alimentazione PoE (alimentazione tramite il cavo ethernet). In questo modo ogni antenna dovrà essere raggiunta solo dal cavo ethernet.
La configurazione di questi Access Point si riduce sostanzialmente all'impostazione dell'SSID e dell'indirizzo IP che deve appartenere alla stessa sottorete dell'Hotspot Router.
Tale sottorete è impostata su 192.168.182.0/24 per i dispositivi basati su DD-WRT, OpenWrt e CoovaAP, mentre i Router Mikrotik lavorano sulla rete 10.182.0.0/16. Nel primo caso andremo ad utilizzare una configurazione del tipo:
-Indirizzo IP: 192.168.182.2 (3,4,5...)
-Subnet: 255.255.255.0
-Gateway: 192.168.182.1
Mentre per Mikrotik avremo:
-Indirizzo IP: 10.182.0.2 (3,4,5...)
-Subnet: 255.255.0.0
-Gateway: 10.182.0.1
Per le antenne Picostation sarà inoltre necessario disabilitare la tecnologia airMAX.
Utilizzo della tecnologia WDS
Esistono situazioni in cui non è possibile connettere con dei cavi ethernet gli Access Point all'Hotspot Router. Si pensi ad esempio ad alberghi sprovvisti di una cablatura ethernet, oppure a campeggi dove disporre una rete di cavi risulta particolarmente complesso e costoso.
In tutti queste situazioni possiamo comunque costruire la nostra rete wireless utilizzando la tecnologia di ripetizione del segnale WDS.
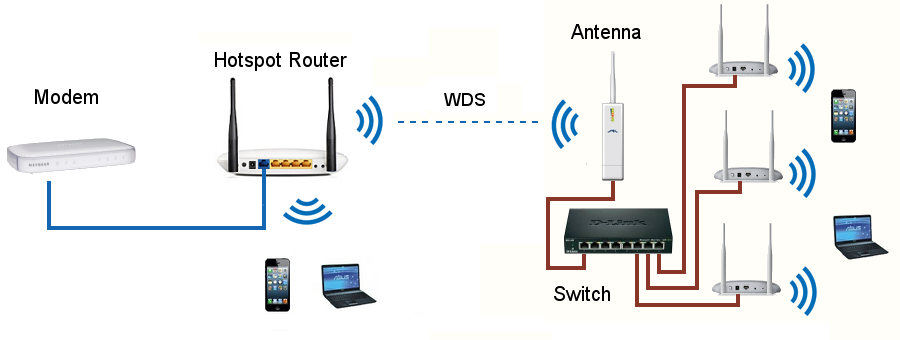
Nello schema precedente possiamo notare che la rete Wi-Fi è stata ampliata con due Router che, sfruttando il WDS, sono collegati all'Hotspot Router senza l'utilizzo di cavi.
Gli utenti dell'Hotspot possono così connettersi indifferentemente al segnale Wi-Fi emesso dall'Hotspot Router o ai segnali emessi dagli altri due Router Wireless oppure spostarsi da una zona di copertura all'altra dei router.
Il grande vantaggio di quest'approccio è che non richiede la stesura di cavi di collegamento, mentre lo svantaggio consiste nella perdita di prestazioni (banda) che cresce al numero di dispositivi connessi in WDS. In generale però la diminuzione di banda non costituisce un problema rilevante in quanto la velocità di trasmissione del Wi-Fi è sempre nettamente superiore alla velocità della connessione ad internet di cui si dispone.
In questo tipo di configurazione riveste un ruolo cruciale la disposizione dei vari router, ognuno dei quali dovrà essere configurato per collegarsi a quello situato più vicino ad esso. In spazi aperti la distanza tra ogni dispositivo può essere anche di molte decine di metri (centinaia di metri nel caso di antenne Ubiquiti), mentre in spazi chiusi difficilmente la distanza potrà superare i 20 metri. Attualmente My Wi-Fi Service supporta il WDS solo per gli Hotspot Router con firmware OpenWrt. Gli altri router della rete WDS dovranno essere dello stesso modello dell'Hotspot Router in quando il funzionamento della tecnologia WDS è garantito solo utilizzando modelli di router dello stesso tipo o che almeno sfruttano lo stesso chipset per il segnale wireless.
Analizziamo ora la configurazione dei dispositivi di una rete WDS che utilizza router wireless TP-Link 841.
L'Hotspot Router (che generalmente viene fornito preconfigurato con il pacchetto base di My Wi-Fi Service) è un Tp-Link 841n con firmware OpenWrt 14, gli altri router sono ancora dei Tp-Link 841n ma con il normale firmware originale.
Configurazione dell'Hotspot Router
Prima di procedere assicuriamoci che non sia attiva l'opzione "Separa il WiFi dalla LAN" presente nelle impostazioni della location, nel pannello di controllo MyWiFi Service. A questo punto l'unica operazione da effettuare su questo router è l'abilitazione del WDS: in Network | WiFi | Edit | Interface Configration dovremo accertarci che la modalità sia impostata in "Access Point (WDS)".
Configurazione degli altri Tp-Link con firmware originale
Le operazioni da compiere sono le seguenti:
- Effettuare un reset utilizzando il pulsante posto sul retro.
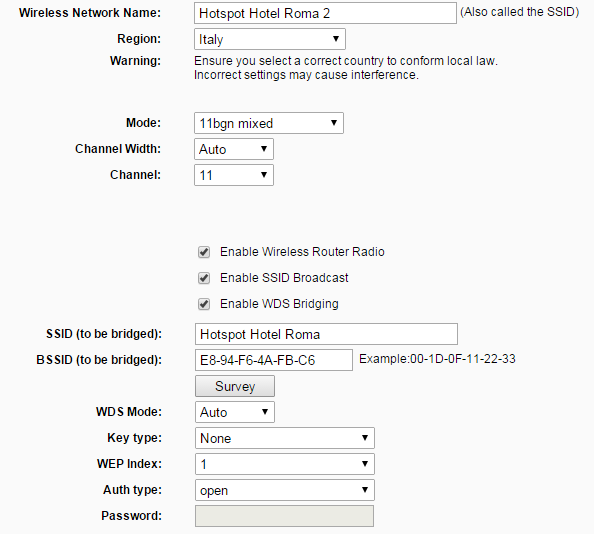
- In Wireless Settings, abilitare "Enable WDS Bridging" e selezionare con il bottone "Survey" la rete con la quale si vuole stabilire il collegamento WDS, impostare Channel allo stesso canale dell'Hotspot Router. Infine, impostare la regione e l'SSID di questo Router (ad Esempio "Hotspot Hotel Roma 2 (3,4,5...)")
- In Wireless Security selezionare "Disable Security"
- In DHCP settings, disabilitare il server DHCP (non effettuare ancora il reboot suggerito)
- In Network | LAN Impostare l'ip della LAN su 192.168.182.2 (3,4,5..)
La configurazione degli altri router è del tutto analoga. Le uniche differenze consistono nell'indirizzo IP, nell'SSID scelto e nel fatto che per gli altri router potremo decidere se stabilire un collegamento WDS con il router principale oppure con uno degli altri router che abbiamo già messo in WDS.
Realizzazione di un ponte con due antenne collegate in WDS
Supponiamo di dover coprire un campeggio all'interno del quale è presente una zona isolata non raggiunta da cavi ethernet.
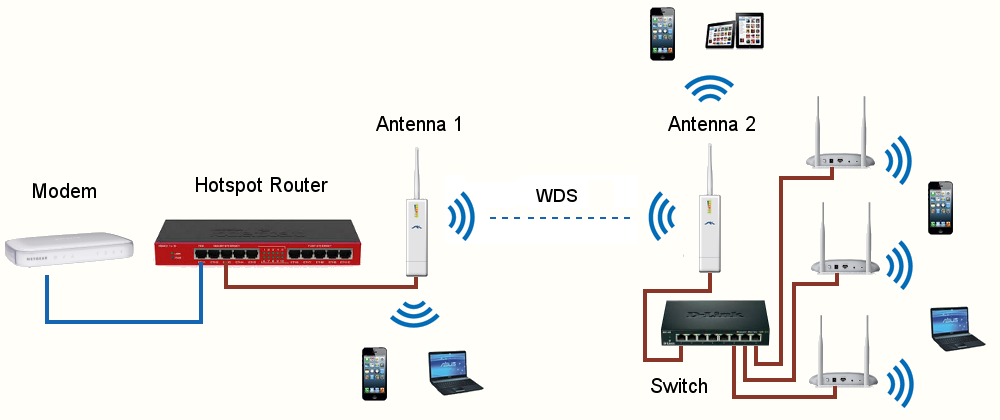
Per diffondere il segnale Wi-Fi in questa zona utilizzeremo due antenne Picostation, la prima collegata tramite cavo ad un Hotspot Router Mikrotik (adatto a gestire gli elevati carichi di un campeggio) e la seconda collegata in WDS alla prima antenna.
Entrambe le antenne forniscono anche un segnale Wi-Fi al quale gli utenti del campeggio possono connettersi.
Inoltre alla seconda antenna, tramite la porta LAN del PoE, è collegato uno switch a cui sono poi collegati diversi ulteriori Access Point (o altre antenne).
Questa configurazione è possibile perché le interfacce Wi-Fi e Lan delle antenne sono in bridge tra loro e quindi la rete Hotspot è accessibile anche dalle porte Lan delle antenne.
Vediamo quali sono i passi da compiere per configurare entrambe le antenne:
- Effettuare un reset utilizzando il pulsante posto sul retro.
- Aprire il browser all'indirizzo 192.168.1.20
- Nel Tab Wireless, impostare Wireless Mode su "AP-Repeater", in WDS Peers inserire il mac address dell'altra antenna, specificare un SSID ed una frequenza (canale) di trasmissione comune alle due antenne, ed infine impostare "Channel Width" su 20 Mhz.
- Nel primo Tab disabilitare la tecnologia airMAX
- In Network | Management Network Settings, impostare l'ip della LAN su 10.182.0.2 (10.182.0.3 per l'altra), subnet 255.255.0.0 e gateway 10.182.0.1
Collegamento in WDS di un antenna ad un Hotspot Router Tp-Link
In questo esempio vedremo come effettuare un collegamento in WDS tra l'Hotspot Router (un TP-Link 841 con firmware OpenWrt) ed un'antenna Picostation.
Tale collegamento è possibile perché, pur trattandosi di dispositivi diversi, entrambi utilizzano lo stesso chipset per il wireless (Atheros).
Si tenga presente che in questo caso gli utenti non potranno collegarsi direttamente all'antenna ma dovranno farlo tramite degli Access Point connessi a quest'ultima.
Per la configurazione dell'Hotspot Router valgono le stesse considerazioni della configurazione WDS tra TP-Link, mentre per l'antenna saranno necessari i seguenti passi:
- Effettuare un reset utilizzando il pulsante posto sul retro.
- Aprire il browser all'indirizzo 192.168.1.20
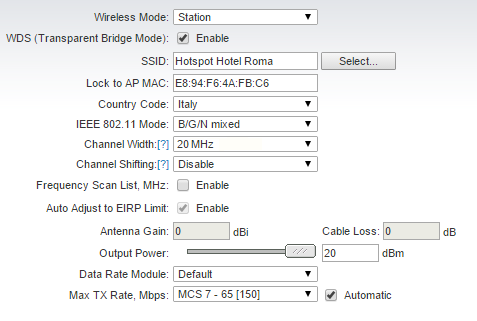
- Nel tab Wireless, impostare Wireless Mode su "Station", abilitare il WDS (Transparent Bridge Mode), cliccare sul bottone "Select...", selezionare la rete con la quale si vuol stabilire il collegamento WDS e cliccare su "Lock to AP". Infine impostare "Channel Width" su 20 Mhz
- In Network | Management Network Settings, impostare l'ip della LAN su 192.168.182.2, subnet 255.255.255.0 e gateway 192.168.182.1
Networks with multiple SSID
Nel caso di utilizzo simultaneo dell'Hotspot e di uno o più Info Portal Wi-Fi siamo in presenza di una rete con almeno due SSID.In questo caso i precedenti schemi non sono applicabili per ripetere tutti gli SSID, ma è necessario ricorrere all'utilizzo delle VLAN come illustrato nel tutorial Realizzazione della rete Info Po
i miei Siti
- Dettagli
- Categoria: Assistenza Software
- Pubblicato Mercoledì, 19 Aprile 2017 13:36
- Scritto da Super User
- Visite: 1794
- http://cristalmassafra.altervista.org
- http://www.caragnanodomenic.altervista.org
- http://www.fujiamataranto.altervista.org
- http://www.karapulia.altervista.org/karapulia/
- http://www.lagunadellesirene.com
- http://lasaracinaricambi.altervista.org
- http://www.mancinifiori.com
- www.lamasseriasantelia.it
- http://scapatimbottitiearredi.altervista.org/
- www.autofficinaisi.altervista.org
- www.isopower.online
- http://fittocasa.altervista.org
- www.intrapc.net
- www.quattrochiakkiere.altervista.org
VMware Workstation 2015 v12.5.3 + Serial
- Dettagli
- Categoria: Assistenza Software
- Pubblicato Domenica, 19 Marzo 2017 15:41
- Scritto da Super User
- Visite: 2070
VMware Workstation 2015 v12.5.3 + Serial
VMware Workstation è una serie di software sviluppati dalla VMware Inc. che consentono di eseguire più sistemi operativi in un ambiente virtuale. Il primo vantaggio che si può vedere e capire logicamente è la possibilità di poter implementare su una piattaforma con sistema operativo Windows o Linux e con relativo hardware, un numero n di altre macchine virtuali con sistema operativo diverso.
- Migliorata la Compatibilità con Windows 8 e 10
- Nuovo Supporto per Applicazioni 3D
Guida Windows 10: Come creare comandi personalizzati per Cortana
- Dettagli
- Categoria: Assistenza Software
- Pubblicato Martedì, 28 Marzo 2017 15:08
- Scritto da Super User
- Visite: 2525
Guida Windows 10: Come creare comandi personalizzati per Cortana
La guida che oggi andremo a proporvi è stata scritta dal nostro utente Alastor Lux e ci aiuterà a creare dei comandi personalizzati per interagire in modo più completo e profondo con Cortana, una delle funzioni più interessanti ed innovative di Windows 10, che tramite comandi vocali ci permette di accedere in modo rapido a molte parti del sistema operativo, ci da la possibilità di avere informazioni cercando sul web o di avviare programmi ed App, il tutto comodamente con la nostra voce pronunciando l’ormai consolidato comando “ehy Cortana” per poter interagire con l’assistente vocale. Ma bando alle ciance ed andiamo subito a vedere come con questa guida possiamo personalizzare i comandi da dare a Cortana.
 Hey Cortana
Per interagire con Cortana vocalmente come detto in precedenza è necessario abilitare il comando vocale di Cortana e pronunciare la frase “ehy Cortana”, consecutivamente il primo comando da pronunciare è “APRI” seguito dalla App che vogliamo aprire, per chiudere la App dobbiamo comunque darle il comando “APRI” in precedenza, e successivamente “CHIUDI”.
ES: “EHY CORTANA ” >>>> “APRI ” >>>> “CHIUDI FACEBOO “
Oppure se vogliamo scegliere cosa chiudere basta darle il comando:
“EHY CORTANA ” >>>> “APRI ” >>>> “CHIUDI”
In questo modo Cortana elenca tutte le app che possiamo chiudere e chiede quale vogliamo scegliere.
Inoltre ricordiamo che Cortana oltre ad APRI risponde anche con i comandi ESEGUI, LANCIA, AVVIA.
Creare il file di chiusura per Applicazioni in 4 passi
Prima di tutto abbiamo bisogno di trovare il file .exe della nostra app:
- Aprire la App ( es . facebook )
- Tasto destro sulla barra delle applicazioni > (1)
- Apri gestione Attività (2)
 Trovare Exe Applicazion
- Nella sezione “Processi” cerchiamo la nostra App in esecuzione
- Tasto destro su di essa (3)
- > ” Vai a Dettagli ” (4)
 Trovare Exe Applicazione 2
- Il nostro file sarà evidenziato (5),
- Tasto destro su di esso >> ” Apri Percorso File ” (6)
 Trovare Exe Applicazione 3
- Il nostro file sarà evidenziato, copiamoci il nome :
- premere ” F2 “
- Premere ” ctrl + c ” ( comando copia ) e chiudere la scheda , facendo attenzione a non modificare nulla.
 Guida Cortana Trovare Exe Applicazione 4
  Guida Cortana Trovare Exe Applicazione
How to fix: Svchost.exe (netsvcs) memory leak or high CPU usage problems
- Dettagli
- Categoria: Assistenza Software
- Pubblicato Domenica, 25 Settembre 2016 14:45
- Scritto da Super User
- Visite: 5398
Svchost.exe is a generic and legitimate Windows process that loads several other critical services for proper Windows operation. But in several cases users are complaining that Svchost.exe is hogging their CPU or Memory resources without obvious reasons e.g. at moments when the user doesn't run any programs.
In many occasions, I have troubleshooted the Svchost.exe (netsvcs) problem by using different solutions to resolve the problem depending on each situation.
From my experience, the Svchost.exe high usage problems – in most cases – occur on computers that are infected by a virus or a malware program. In the rest of the cases, the Svchost.exe (netsvcs) high CPU or Memory leak problems, can be caused by a Windows Update, or by a full Event log file or by other programs or services that start many processes during their execution. In this tutorial you can find detailed instructions on how to troubleshoot and resolve memory leak or high CPU usage problems caused by svchost {Svchost.exe (netsvcs)}.
How to solve 100 % Svchost.exe (netsvcs) High Memory or CPU usage problems.
Solution 1. Scan your computer for viruses.
Solution 2. Find and Disable the service that cause the "svchost" high usage problem.
Solution 3: Empty Event viewer log.
Solution 4: Troubleshoot Windows Updates problems.
Latest updates and solutions to fix the "svchost" high usage issue.
Solution 1. Scan your computer for viruses.
Many viruses or malicious programs can cause the svchost.exe high CPU/memory usage problem. So, before you continue to troubleshoot the Svchost.exe high CPU usage problem, use this Malware Scan and Removal Guide to check and remove viruses or/and malicious programs that may be running on your computer.
Solution 2. Find and Disable the service that causes the "svchost" high CPU usage problem.
Svchost.exe is a process that is needed by several services or programs in order for them to run. So, determine which service or program runs under the svchost.exe process and is hogging your system's CPU and memory resources and then proceed to disable or totally uninstall that program (or service).
1. Press Ctlr+Alt+Del keys simultaneously and then open Task Manager.
2. At Processes tab, check the Show processes from all users checkbox.
3. Right-click on the high usage svchost.exe process and select Go to Service(s).

4. At services tab you should see several highlighted services that run under the svchost.exe process.
5. Now it 's time to find out which process is hogging CPU resources: To do that, you have two ways.
A) You can perform a sequentially search using Google (for all highlighted services) and see if the searched service is critical – or not – for your computer.
Or –
B) You can try to sequentially stop services (one by one) until CPU resources come back to normal. To stop a service temporary:
- Choose a service
- Right-click on it, and choose Stop Service.
 6. After you have figured out the culprit service or program, then navigate to Services in Computer Management to disable that service (or totally remove the culprit program).To disable a service on your computer permanently:1. Simultaneously press Windows key + R to open run command box.2. In run command box, type: services.msc and press Enter.
 3. At Services management window, right-click at the culprit service and choose Properties.
 4. Change the Startup type to Disabled, press OK and restart your computer.
Solution 3: Empty Event viewer log.
In some cases the svchost.exe high CPU (or high Memory) usage problem has to do with the large log files in Windows event viewer. So, another solution is to clear Event Viewer's log. To do that:
1. Simultaneously press Windows key + R to open run command box.
2. In run command box, type: eventvwr and press Enter.
3. At Event Viewer: Double-click to expand Windows Logs.
4. Right-click on Application and choose Clear Log.
5. Perform the same operation and clear the Security, Setup, and System log.
6. Restart your computer.
Solution 4: Troubleshoot Windows Updates problems.
In other computers, the svchost.exe high usage problem may occur when Windows searches for updates (in the background). In order to troubleshoot high CPU usage problems during Windows Update, perform the following steps.
Step 1. Force Windows to re-create an empty Windows Update Store folder.
The Windows Update Store folder (commonly known as "SoftwareDistribution" folder), is the location where Windows stores the downloaded updates. If this folder is corrupted, then you will face problems during Windows Update. So, first try to force Windows to re-create a new empty SoftwareDistribution folder. To do that:
1. Simultaneously press Windows key + R to open run command box.
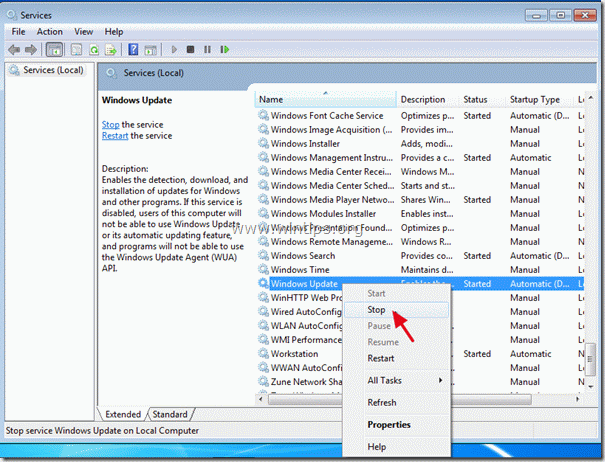
2. In run command box, type: services.msc and press Enter.
3. Search for Windows Update service, then right click on it and select Stop.
3. Navigate to “C:Windows” folder.
4. Delete * (or rename e.g. to “SoftwareDistributionOLD”) the “SoftwareDistribution” folder.
* Note: Upon restart, the next time the Windows Update checks for available updates, a new empty SoftwareDistribution folder will be created automatically by Windows to store updates.
5. Restart your computer and then try to check for updates.
6. If the "svchost" high CPU usage problem persists, continue to the next step.
Step 2. Run Windows Update Troubleshooter
1. Download Microsoft's Windows Update Troubleshooter to your computer.
2. Run Windows Update Troubleshooter and press Accept at the first screen.
3. Select the Detect problems and apply the fixes for (Recommended) option.
4. Let the program to fix problems with Windows Update and then restart your computer.
5. Check for Updates again and if the svchost.exe high CPU usage problem persists continue to the next step.
Step 3. Install the latest version of Windows Update Agent.
1. Navigate to Windows Update Agent download site and download the appropriate package for your Windows edition and version.
2. Run WindowsUpdateAgent*.exe
3. Close all open programs and choose Next.
4. Choose Agree and press Next.
5. Let the installer finish the installation and then restart your computer.
Step 4. Install the critical Microsoft Security Bulletin MS13-097.
1. Navigate to https://technet.microsoft.com/library/security/ms13-097 and click at the appropriate Internet Explorer Cumulative Security Update (2898785) according to your Internet Explorer version and Windows Version.
2. At the next screen choose your IE's (menu) language and choose Download.
3. Run "IE11_Windows*-KB289875*.exe" and follow the on screen instruction to install the update.
4. Restart your computer and check for updates again.
Step 5: Fix Windows Corrupted System files by using the System Update Readiness tool (aka "Deployment Image Servicing and Management" – DISM tool).
1. Navigate to System Update Readiness tool download site and download the DISM tool for your Windows edition and version. *
* Note: Windows 8 already contains the DISM tool and you don't have to download anything. Just open an elevated command prompt and type: DISM.exe /Online /Cleanup-image /Restorehealth (Detailed instructions on how you can run DISM in Windows 8/8.1 can be found here)
2. Double click to install the downloaded file (e.g. Windows6.1-KB947821-v34-x86.msu).
3. When the installation is completed, restart your computer.
4. Force Windows to check for updates again and see if the svchost high usage problem still persists.
UPDATE – 16/10/2015
Other solutions that I have applied in different cases (computers) in which the "svchost.exe" high usage problem is caused while searching for updates.
Case 1: Applied on a new Windows 7 SP1 installation.
a. Uninstall the KB2562937 from Installed Updates.
b. Restart the computer.
Case 2. Applied on a HP Notebook with Windows 7 SP1 Home.
a. Install the Security Update KB2993651 according your OS version.
- Security Update for Windows 7 for x86 based Systems (KB2993651)
- Security Update for Windows 7 for x64-based Systems (KB2993651)
- Security Update for Windows 8.1 for x86-based Systems (KB2993651)
- Security Update for Windows 8.1 for x64-based Systems (KB2993651)
- b. Reset Windows Update Components.c. Restart the computer.
UPDATE – 22/03/2016
(Applied to: Windows 7 SP1 & Windows Server 2008 R2 SP1.)
1. First make sure that you have already installed Internet Explorer 11 on your computer.
2. Download and install the KB3102810 security update according your OS version *. (If installation hangs, restart the computer and then immediately install the Update).
3. Restart your computer and then delete the "SoftwareDistribution" folder by following the instructions on Step 1 (only) from Solution 4 above.
4. Restart your computer and check for updates.
UPDATE – 29/06/2016
(Applied to: Windows 7 SP1 & Windows Server 2008 R2 SP1.)
1. Download and install the June 2016 Windows Update Rollup KB3161608 according your OS Version. *
* Note: If installation hangs: Restart your computer, Stop the Windows Update service and then Install the update.
- If after doing all these, you still face high CPU or Memory usage problems, then disable Windows Update completely or re-install Windows on you computer. If you use Windows 8 or Windows 8.1 you can perform also a system refresh.
Good Luck!
Let me know if this guide has helped you by leaving your comment about your experience. Please like and share this guide to help others.


